Sunday, January 31, 2010

Internship and beyond

So...... what happens after we complete the 12 weeks of classes and the final exam?
Well, we're not certified Master Gardeners...... we're Master Gardener Interns and transition to the next phase of the program.  In a nutshell, here's what we'll have to do:

  • FIELD WORK:   90 hours total.  45 hours are to be done this year, with the remaining next year, during which we must complete:
    • Minimum of 5 clinics (these are QandA booths, located at places where gardeners tend to hang out..... garden centers, nurseries, farmer's markets etc).
    • Minimum of 4 garden shifts (can go to any or all of the following: MG-sanctioned demo garden, youth garden, outreach garden or teaching kit (more about this one later)).
    • 5 clinics and 4 garden shifts will get us to around 36 hours, so the remainder of our hours can be made up doing any of the following:
      • More of the above (clinics and/or garden shifts).
      • Phone clinic
      • MG-approved special events
      • Serve on the foundation board
      • Help out in the office
      • Become a speaker and give presentations
  • CONTINUING EDUCATION:  Before the end of next year we must complete and additional 10 hours of continuing education. This can be done in a number of ways:
    • MG events: workshops, annual conference, sponsored classes.
    • Docent-led tours of Northwest gardens.
    • Accredited horticultural education.
    • Pesticide certifications.
    • Self study (online modules/quizzes)
    • Approved research projects
    • Anything listed in the "news you can use" emails sent to all MGers/students.
It's a hefty time commitment for the first year but eases up somewhat in the second.  I do know of a few classmates who work full time AND have children and they seem to be handling it, so with a little planning, organization and keeping up with assignments, it's definitely something the younger generation can take on.

Once we've done all the field work and CE stuff we'll become certified Master Gardeners. To stay certified we'll have to commit to doing 25 hours/yr of field work, plus 10 hours/yr of continuing ed.  Submit quarterly timesheets, re-register to confirm we're still wanting to participate and voila.... we stay certified.

So....... got any questions about the program?   Have I been able to give you a good feel for what it's like so far?  Throw me a Q if you need to.......

Saturday, January 30, 2010

Class Session # 4

Another full day. 
The good - more interesting information to add to our store of ever-growing knowledge.
The not so good - all that sitting   : (

First item on the agenda was some MG administrative stuff.   Elaine Anderson, the Program Director, walked us through what we'll be doing after we complete our 12 weeks of classes and the final exam..... the internship period and beyond.  I'll tell you about that later.... stay tuned.

With the admin stuff behind us we then had a very entertaining presentation on Orchard Mason Bees from Missy Anderson...... who came complete with a black outfit and antennae headband (yes, she really loves these little guys!). 

Soup to nuts details and some amazing facts - very cool!   I highly recommend you get in touch with Missy and invite her to come and present to folks in your community - you won't be disappointed!  She can be reached at orchardmasonbees@yahoo.com.

After lunch, Amy Ockerlander from Seattle Tilth gave us an informative lecture on Organic Gardening, afterwhich we had another discussion on Integrated Pest Management (IPM).... showing us photos of plant damage, discussing the culprits and continually emphasizing the importance of really picking apart the problem to ferret out root cause......which will often lead us right back to good ol' homo sapiens and some gardening no-no that's occurred. 

So, that's four classes done, with eight more to go.... we're 1/3 the way through the classroom training...... woo hoo!   Apart from having a numb bum from all the sitting, it's a real blast!  So worth it!

Thursday, January 28, 2010

Getting things moving

We've got nine more classes to go......
....... and the thought of having to sit still through all of that doesn't appeal to me at all.   Led me to pondering what other ways the MG folks could help us learn all this good gardening stuff, while getting us off our duffs and moving around a bit more.  Here are some ideas...... can you think of others?
  • GETTING TO KNOW YOU..... great for first few weeks of class. Distribute Question and Answer cards among the team (ensuring that no one person gets both the Q and the corresponding A cards).   We then meet and mingle with our team mates until we find the right answer pairing.  Keep going until all cards are paired off.  
  • TEAM UP.... get some interaction and competition going between the tables..... give each table a set of reference books on a given subject and a crossword puzzle to solve.  First team to finish gets a reward. 
  • CROSS TEAM NETWORKING..... get teams meeting each other.  Pair the tables up and have us complete an activity on a given topic.  Rotate tables in subsequent weeks to encourage more networking.
  • TREASURE HUNTS..... walk around the grounds discovering information/answering questions/performing tasks.
  • LIBRARY LOOK-UP..... give us a list of questions and have us go into the library to find the answers.
  • ROLE PLAY. Pair us off with practice questions on a given topic.... see how we handle the pressure.
  • JEOPARDY - MG STYLE. I'll take Hybrids for $200 please!

Wednesday, January 27, 2010

Week 3 - homework and stuff

For those of you who have been following my blog to learn what we aspiring MGers have to do to get certified, here's the text book we're using:


...... and here's what we had to get done this week:

  • Read three more chapters of the text book (got the text books in class last Saturday, so this time we got to read hard copy and not from a screen..... sooooooo much easier... woo hoo!).
  • For each chapter, complete an online quiz.
  • Complete another online crossword - was a pretty easy one this time. Some of the others have had the odd "nasty" word in there that really had me scratching my head to get the answer....
  • Look at a "before" and "after" picture and spot the differences (good water/pollution management vs how not to do it). Thought that activity was a VERY creative way to get the points across, though the graphics were not that good, so it was a bit tricky to spot the differences.
  • Watch about 1 hour of online videos on water management.
  • Review umpteen more links to interesting, and not-so-interesting-but-necessary-to-know, websites
All in all, not a bad week of homework...... or maybe it's just that I'm fully settled into the "school" routine.

One piece of advice I would like to impart...... if you do decide to go through the program, take the time to clear your calendar of some of your other commitments so you can really get into the material and not just do the minimum requirements. I did that and I'm seeing it pay off..... I have the time to do the "extra" work without being stressed about the time factor...... and that "extra" stuff isn't just the cherry on top of the sundae.... it's big scoops of good information that will solidify your understanding of a given topic.

Monday, January 25, 2010

Monday morning musings

Most mornings (if it's not chucking it down with rain) I'm reminded by our big kittie, Twist, that it's time to go out for a little walk.........


........ a 5-10 minute figure-eight shaped stroll around the front of our property, mostly so he can reclaim turf from the visitors that have passed through the night before. With cup of tea in hand off we go..... a peaceful time, just the two of us.
  
Bright and early this morning he gives me my reminder and I happily head for the door (he's a vocal kittie and doesn't mince meows when it's his time to be front and center).   Off we go, him doing his thing and me following along nearby, and as I look around at our landscape I find myself pondering all this gardening stuff we've been learning..... and I'm smiling.   Oh,  how my eyes are opening wider to the wonders of what happens in a garden, and how some of the things I've done over the years now look so silly, time/$ wasting or were just plain wrong.   There's no way in twelve weeks of classes and 90 hours of intern experience we're going to master all this stuff..... even a life-time of learning and living won't do that, but we'll certainly come away wiser and more respectful of the processes at work.   Many people think that Master Gardeners just help others grow pretty flowers and have beautiful gardens  ..... and yes, in part that's what they do, but more importantly, they enable people to become better stewards of the land....... and for me, that's where the real pleasure/reward will be.

Saturday, January 23, 2010

IPM: Key Learnings

Integrated Pest Management - a planet-friendly way to manage the not-so-nice things that happen in our gardens.  IPM is a progressive process that starts with prevention.


What follows is for home gardeners.  If you're known for pulling out the artillery when a pest comes along (been there, done that, guilty as charged).... perhaps this information will help you become a kinder, gentler manager of your domain.  The steps below need to be done in the order shown.  Only go as far down the list as you need to until the problem is resolved - least harmful to most harmful.  Hopefully you'll never have to go all the way......
  1. PREVENTION COMES FIRST.   Aim to prevent pest problems from starting. Buy strong, healthy plants and the right plants for the right location; proper nutrition/watering/care; appropriate soil conditions; plant rotations and the like.
  2. IDENTIFY THE PEST.  Confirm the one you see is in fact the one doing the damage.  There may be other animals/insects/organisms in the area that are just passing through but not guilty of a crime.  Be sure you understand the lifecycle of the pest.... it may be at the end of it's damaging phase (caterpillar chomping on your leaves) and moving to a new phase that might be beneficial, so no need to do anything, the worst is over.
  3. BE TOLERANT.  How much damage are YOU and the affected PLANT(S) able to tolerate?  Does the odd deer nibble warrant putting up an 8ft fence?  A few chewed leaves may not be compromising the overall health or appearance of the plant.   Is it really THAT serious?
  4. GET PHYSICAL.  Seek a physical method for dealing with the problem.  Squoosh the slug or do what I do and stick'em - flick'em with a garden stake; prune out the leaves that have the aphids, or blast them off with the water hose; put up some sort of barrier, try mulching or setting out a sticky trap.
  5. BIOLOGY BASICS.   Look for ways to introduce beneficial insects/animals.  You can buy lady bugs and praying mantis over the Internet and often find them in home improvement stores in the spring.  Try introducing companion plantings which bring in the good guys.   The Asteraceae family of plants (sunflower, daisy, asters, chrysanthemums etc) attract the largest variety of beneficial insects.  Got a deer problem?  Get a dog.
  6. MICRO-MANAGE.   The microorganism Bacillus thurringiensis (B.t) focuses on a small range of insects and isn't harmful to humans, plants and other animals.  Three strains of B.t focus on different groups of bugs - find the right strain for the problem you're targeting.
  7. NATURE'S CHEMISTRY CLASS.  Try insecticidal soaps or horticultural oils, or botanical insecticides like neem extract.  These products come in different strengths - find the gentlest one that'll take care of your problem. 
  8. INTRODUCE INORGANICS.  Try fungicides and insecticides using sulfur or copper.  If you've got a slug problem, try putting down copper strips.
  9. SMART ABOUT SYNTHETICS.  Only as a last resort, when all these other methods have failed, look for a synthetic pesticide.  Be a wise consumer and select one with the following characteristics wherever possible:  a) only targets the specific pest, b) does the least harm to the other plants/critters, c) is least harmful to the environment and d) is least toxic to apply.  


Here are a few websites / resources you might want to check out:

http://pep.wsu.edu/hortsense
Pick the pest, read up on how best to manage the problems it causes.
Pick the plant, read up on typical pest problems it experiences, and how to manage them.

http://gardening.wsu.edu/
HUGE database of pest problem Q&As.  Can't find the answer, submit your question and an expert will get back to you.

http://extoxnet.orst.edu/
Really curious about a specific pesticide product you already have, or are looking to buy?  Use this site to read the product label in detail, learn about active ingredient toxicity, and obtain material safety data sheets that discuss information NOT included on the label.

Integrated Pest Management
I saw this book on a few of the tables in class today..... seems to be a good reference on the IPM topic.  Thought you might want to add it to your own gardening library.

And finally, some points to ponder......
  • Most plant problems are not caused by pests.  66% of plant problems are the result of us not knowing how to garden.... heh, as much as we may not want to admit it.....we're the pest!  
  • Don't be fooled by pesticide labels with terms like "natural" and "organic" - they don't necessarily mean the product is safe.  Poisonous mushrooms are natural and botulism is organic, but they're not safe. 
  • Hazard = poison x dose (exposure) + size/weight of individual.  So, a big hunking storage drum of Malathion in a warehouse down the road is less hazardous to you than a gallon of pesticide applied incorrectly on a lawn where children play.
  • Look for the signal word on the pesticide label.  The three choices a product can have are "caution", "warning" or "danger".  These words apply to the percentage of active ingredient + inert (other) ingredients in the product.  "Caution" containing the least amount and "Danger" containing the most.   So, if you have products to choose from, aim for the one with "caution" on the label.
  • Not all pesticide products are required to have the standard EPA label.  Some are exempt from these rules and for them, anything goes.  This 25b list is worth knowing about. 
  • Think about it....... if the product you select requires you to deck yourself out in protective clothing and go through a regimented clean-up/disposal process, is that a good product to be buying?  Probably not.  There's a wide array of pesticides out there - more and more of them now able to to take care of your pest problem in a planet-friendly way.  Choose wisely.  Be a friend to your garden, your neighbors and this beautiful planet we call home. 

Class Session # 3

Man, that was a grinder..... not the content, that was quite interesting, but the fact that we had to SIT through a L-O-N-G day of lecturing....  I'm just not someone that can sit still for very long, so a full day of it was a real pill to swallow.

Mary Robson was our presenter today...... for both the morning and afternoon sessions.
This morning could have easily turned into an absolute misery - crawling through the details of pesticides, EPA, regulatory history and policy, evolving environmental attitudes and the like, but Mary did a great job of keeping things moving along, and her great sense of humor helped get the point across on many key points. 

After lunch we took on lighter topics..... roses and bulbs.   Roses..... aaaaaah, the quintessential English flower....


.....you'd think my heritage would give me a leg up on the subject, but alas, I seriously lack intelligence in this area, except for being an expert at receiving gorgeous bouquets of them from my adoring husband!    Using photos from her own garden and other places she's visited,  Mary showed us how to tell the difference between Hybrid Tea roses, Old Roses, English Roses... and the umpteen other variations of roses that are out there....... plus she shared many other nuggets of information on care, growing preferences, common diseases and the like.

Bulbs........ spring bulbs to be exact, was the final topic of the day.  


From what makes a bulb a bulb and a corm a corm, to understanding their annual growing cycle and which are the most fragrant, spread most rapidly, and transplant well.  With daffies already peeking out of the ground outside this was a delightful way to end our day, and to celebrate the fact that we're 1/4 of the way through the classes.  Time sure does fly when you're having fun, doesn't it?!    :)


Wednesday, January 20, 2010

Week 2 - homework and stuff

Another busy week..... getting into a routine now, so that's helping.

I'm hitting up all the required stuff first..... get it out of the way on Sundays so the pressure's off..... that way, if the upcoming work-week turns into one from hell, I'm not in panic mode trying to get stuff done.  I then spend the rest of the week checking off the other activities here and there as time permits.  One or two activities per night is a nice amount.... 30-45 mins here and there.... some nights I don't do any MG stuff because I'm off pursuing other hobbies/interests/community/family things.

This week's required work consisted of reading 3 more chapters from the online textbook and taking 3 more online quizzes.  I'll be really glad when the text books arrive.... still don't like having to read the stuff online and not have something to readily reference.  Hopefully we'll get the books at next Saturday's class.

Starting to see a pattern with the other activities..... two more crosswords, a pesticide label quiz, a bulbs and more picture quiz, two discussion questions, 2+ hours of videos to watch and umpteen links to peruse and ponder.

If you really take the time to go through it all you're easily looking at 8+ hours of effort.  You could skim through it and do just the bare minimum in about 2-3 hours, but wouldn't be doing yourself any justice.

Sure, some of it's boring and a few items are not well edited/produced, but most of it's pretty well prepared and presented, it's interesting and cool stuff to know.  We're only into this a few weeks but I already feel I'm learning soooooo much good information.  Well worth the effort.


Tuesday, January 19, 2010

Flowers: Key learnings

I don't think I can call these KEY learnings.... more like COOL learnings..... just a hodge podge of discoveries from last week's discussion about flowers.   I remember learning some of this stuff back in high school but didn't appreciate the wonders of it all.......now time has changed my perspective.
  • There are two groups of plants that produce seeds:  Gymnosperms ("naked - seeds") - conifers, and Angiosperms ("house - seeds") - plants that flower and produce seeds inside a fruit.
  • A flower is the reproductive organ of a seed-producing plant that flowers.

  • The male sex parts of a flower consist of the filament (stalk) and anther (pollen container).  You can see that quite clearly in the photo of this lily - those white stalks with brown heads on them.
  • The female sex parts consists of the stigma (tip), style (stalk) and ovary (base).  In the photo of this lily it's that pale, slightly swollen yellow stalk in the center of the flower.
  • Take a look at this sunflower..... look closely..... what do you see?


    ..... those petals are not really petals.... each one is a complete female flower.... and the center part is really hundreds of itty, bitty male flowers. So what you're really looking at is a community of flowers, not just one single flower head. All members of the ASTERACEAE family have this characteristic.... so that includes plants like daisies, chrysanthemums, and purple cone flowers....architectural wonders!
  • Think of all the things you eat that contain seeds - melons, cucumbers, squash, peppers, apples, berries, okra and the like.  Technically, ALL of these things are fruits, and in plant-speak, a fruit is the mature ovary.  It's the ovary that produces the plant's babies - the seeds.  You can see how this process works in the following sequence of photos. 
Here we have the flower of a yellow squash.....


The flower gets pollinated and the ovary at the base of the flower then starts to swell and mature......baby seeds growing inside.


Eventually the flower dies and drops off and the ovary continues to grow into the fruit,  in this case a yellow squash, containing the seeds of the next generation.


  • Some orchid species, in order to take advantage of a prolific pollinator, have evolved in color/shape to become dead ringers of a female insect.  Along comes the male and sees what to him looks like a gorgeous female and yes, you guessed it..... as he's having his jollies he gets covered in the orchid's pollen. When his little tryst is done, off he flies looking for the next gorgeous female, taking the pollen with him.... and so goes the reproductive life cycle of an orchid.  Wonder if the insect ever figures out what's going on?!
  • And finally...... ever wondered what makes plants grow towards the light?  It's a hormone called Auxin.   Auxin stimulates growth, but is destroyed by light.  So, the shady side of a plant produces more Auxin which stimulates more plant cells to grow on that side, forcing the plant to grow unevenly.... and grow towards the light.  Cool huh?  Share that at your next cocktail party!
Flowers...... what diverse, intricate, beautifully engineered, deceiving marvels of mother nature they are!

Sunday, January 17, 2010

Photos from class

Well, I've given up trying to figure out how to get a slide show working.  Didn't want to hold up showing you what it's like at our Saturday class, so here we go......

We meet at the Center for Urban Horticulture, http://www.urbanhort.org/ on/near the University of Washington campus in Seattle.


Quite a sprawling facility that includes a research conservatory......


.......couple of lecture halls, a library.....


......... display gardens, greenhouses and trails on the expansive grounds.  Even in winter it looks lovely doesn't it?


This courtyard is right outside the classroom doors.....


With close to 100 students in the program, the hall we're in obviously has to be pretty big....


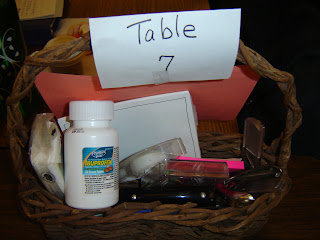
We're divided up into Groups/Tables.... 8 students and 1 mentor to a table. Here's out little hang out. Each week the location of our table changes so we're not in the same place in the room each week.


This little basket of supplies is on our table.... notice the Ibuprofin bottle! We got through Plant ID / botanical classifications without having to take any.........


I don't think this sign out on the grounds is meant to point people in our direction.....at least not just yet..... guess they have an MG resource available while class is in session....... but then again, maybe it's there to inspire us to greatness! :)


So beautiful.......


Saturday, January 16, 2010

Class Session # 2

My head's spinning..... a whole day of plant anatomy, ID and botanical classifications......got a whole pile of new words to add to my vocabulary:  scions, parenchyma, tepals, dioecius, involucre, monoecious, cymes, capitula, actinomorphic, zygomorphic, capitulum, hypanthium, monadelphus, connivent, silique, silicle, umbel, schizocarp, and here's a doozy... poricidal dehiscence.... try saying that fast 5 times.  Not to mention all the latin names...... don't even go there!   Suffice to say, if I ever remember any of these words I'm going to be one mean, lean Scrabble-winning machine next time I play, so watch out! 

The instructor, Dr. David Deardorff (http://www.ddandkw.com/) did a super job of keeping things moving along, making things interesting and actually teaching us something that could easily become desperately boring or over-the-top confusing.    To help us understand how to identify a plant using the "key" system we were given three different plants:  a carnation, a daisy and a lily and by carefully examining the flower (literally taking it apart piece by piece) and following the "key" system we were able to figure out which family the plant belonged to - and the answer is, caryophyllaceae, asteraceae and liliaceae families respectively.  If you're familiar with "if-then" statements well that's sort of what the key system is like....  you start with a high level feature, say the petals, and then if the petals look like this, then go this way through the key, but if the petals look like that, then go that way.  At the next level, you take the next feature of the flower, say the ovary, and repeat the process... if the ovary is superior go this way, if it's inferior go that.... and so on, step by step working through the "ladder" of options until you dead end at the family name.   Kinda cool how it works.... in principal pretty logical, but in reality easy to get totally lost.  Flowers are not simple constructs..... we learned that big time today.  They are amazingly varied, intricate, and sometimes deceivingly complex.... a true marvel of mother nature.  I don't think I'll ever look at a flower the same way again.....

I had a chance to talk to Dr. Deardorff during one of the breaks and got my botanical classification questions answered....makes sense now..... I'll post another blog soon with some key learnings on that topic - stay tuned. 

Well, that's enough for one day...... will start up on the next round of reading assignments and quizzes tomorrow..... g'night.

Friday, January 15, 2010

Week 1 - homework and stuff

Week 1 done..... required homework consisted of reading 3 chapters from an online text book and taking three quizzes (one for each chapter).  Optional stuff included watching videos, doing crossword puzzles, labelling diagrams, trying a soil texture experiment, reviewing USDA zone maps, looking at soil photos etc.  TONS of material..... no way to absorb it, but I did try to spend time getting familiar with it all so if/when I need to reference it I'll know where to go.

The required readings/quizzes took longer than I'd hoped.... about 6 hours.... I'm not a fan of reading out of an online textbook.... so much quicker to read/highlight/reference stuff when it's in hard copy.  Seems like I'm not the only one with that gripe..... mid-week we got an email offering to let us buy the text book..... umpteen of us jumped at it, me included.  Phew!   I guess a lot of folks sent in an email complaining about things..... usual aches and pains of transitioning to an online delivery system.

The quizzes were short!  I was expecting lots of Qs but there were less than 10 on each quiz.  Multiple choice answers.  A couple of tricky ones in there, but for the most part if you just thought it all through and had read the material you could get the answer.

I enjoyed a lot of the optional assignments..... creative ways to help reinforce our learnings.  Crossword puzzles were cool!  There was a nice video on how to analyze soil texture.... very well done.  The guy explained it very clearly and demonstrated it as he was talking.   I went out into my garden later on and gave it a whirl..... think I made more of a mess than anything, but I got the idea and the principles of clay, sand, silt ratios etc now make sense.

Part of the homework included learning about botanical classifications:   Family, Genus, Species, Specific Epithet, Variety, Cultivar, Hybrid.... and all those Latin words.... oh my!    I tried applying things to the lavender family and don't think I have it right.... when I get it sorted out I'll let you know.  I've started to create a little table to help get my head around it.... think you might find it helpful too! Just need to get some Qs answered in class tomorrow to confirm I have it right.   Stay tuned.

In just one week we've been pointed to umpteen links/resources for information.  To make it easy to reference I'm consolidating it all on an Excel spreadsheet..... if you'd like to get a copy when the course is over, let me know and I'll be sure to send you one!

I horsed around with the photo features on this blog.... tried to set up a slide show, but can't seem to get it going.  If anyone knows how to do that on blogspot please let me know.  I'd love to share photos with you over the course of this program. 

Soil Question: Ferns and Clay Soil

I got my first question from a blog viewer! It came from a Master Gardener..... (wonder if I'm being tested!). Here's the question:


"I am about to amend my clay soil driveway hillside with composted horse manure so that I can move ferns from elsewhere on my property into new holes. Ferns like lots of forest compost. I am leary of this introduction of very rich compost into holes dug in clay. How well with the ferns do? Will they do poorly once their little connecting roots hit the clay? I bet so. Thoughts?"

...... and here was my answer:
"I think you need to do more than just dig a hole and stick a dollop of composted manure in it. You need to condition the entire area where roots are likely to spread. Maybe add some sand to your amendment so that when all the manure breaks down you're not right back where you started with just clay and dying ferns, but you've begun to give your soil some texture so it can hold nutrients/air etc better over the long haul. I did some looking about in my gardening books and found a recommendation to also consider adding some gypsum, along with the sand, to help loosen up your clay soil.... it adds Ca and doesn't change the pH.
Manure raises N2 levels and lowers pH. Couldn't find out what makes ferns happy.... you know the answer to that one?"

Whatcha think? Would you have said something different? I'm open to feedback.... only way to really know if you've learned this stuff is to jump in and give it a go!

Wednesday, January 13, 2010

Soils: Key Learnings

Finished the module on SOILS.  Oh boy, there's TONS of information to potentially share.... no way I could do a productive blog on all of it so I'm going to focus on "key learnings".  These could be a few things I personally found interesting or something I think the average gardener doesn't typically know but would be cool / good to know.  Here we go......

1.  Opening statement in this chapter said..."The success of your garden depends on your SOIL, so don't treat it like DIRT!"   By the time I'd finished going through all the material I sure did come away with a better appreciation for soil, that's for sure.  Takeaway for me was if you want to really do justice to your garden take the time to learn as much as you can about soil.... no pun intended, but it really is the foundation to any successful garden.  If you're like me, you're drawn to the gardening books with all the pretty pictures of flowers, "encyclopedias" of this, that and the other, but one good reference book that discusses soils, amendments, fertilizing and composting would, IMHO, be a better investment of time and $$.

2.   I discovered a new word to add to my vocabulary:  Ped - an itty bitty clump of soil.  Try using that one next time you play Scrabble!

3.  Get a basic understanding of the Nitrogen Cycle and the Soil Food Web.  These concepts explain how soil processes nutrients and solid matter into usable food for plants.  There's a lot of cool things happening that we don't see..... knowing what's going on will help you garden more intelligently.  
Here's a wiki article on the Nitrogen Cycle:  http://en.wikipedia.org/wiki/Nitrogen_cycle
Here's one on the Soil Food Web:  http://en.wikipedia.org/wiki/Soil_food_web

4.  Here's a piece of trivia:  1/4tsp of soil contains billions of organisms.... most of them friendly critters doing good things for your soil.  Take away for me on this one was the need to respect the natural balance in soil and tinker with it as little as possible.  Don't till to death, heap on fertilizers, compost and the like (yes, I'm guilty).... use amendments in an amount that optimizes your soil's nutrient potential while minimizing your disturbance of nature's natural processes.

4.  Fertilizers come in two forms:  natural (organic) and man-made (processed).  For the most part, natural ones provide nutrients more slowly over a longer period and man-made ones provide nutrients rapidly over a shorter amount of time.  Excess of either is NOT a good thing... you won't get bigger, healthier plants, you'll more likely just waste $$,  get plant problems (poor health/yields) and mess up that natural balance of good things in your soil.

5.  It takes a heap of fossil fuel to produce processed fertilizers.  Yikes!  I think I'll try to do things organically where possible and keep my processed fertilizing to a minimum.  

I'll save fertilizer calculations and application tips for a later blog.  I had Qs for the instructor and need to ponder that topic some more before I try to share my learnings.

If you have a soil-related Q.... let me know.  Happy to dig around and find you an answer!

Sunday, January 10, 2010

First day of class

A good day.    Lots of bright, energetic, entertaining people all interested in the same thing! 

I took some photos to show you...... when I can figure out how to set up the photo thingy I'll post a slide show so you can get a feel for where we are (Seattle's Center for Urban Horticulture) and how the class logistics work.  May need to call in the troops (aka, my husband Clint, who's a technical genius) to assist.  Stay tuned on that one.

So.... how did the day go?  Well, after a "welcome" message and some general housekeeping stuff we each got to introduce ourselves.  A brief 30-45 seconds to stand up and say something.... no set format or anything so some of it was boring "nice to be here" stuff, but every so often we'd hear a good one!   One guy, a young chap, said gardening was his TV..... that got a round of applause!   One woman talked about how her Dad ran his family like a business and paid his kids to go dig up weeds. $1.50 a bucket was the reward.  Proudly she'd bring her filled-up bucket up to Dad to get her payment and Dad would stomp his foot in the bucket and push all the weeds down and tell her to go back and weed some more!    Another woman was inspired by the Barbara Kingsolver book, "Animal, Vegetable, Miracle" and started a blog to talk about her journey to a more sustainable lifestyle/diet.  I saw lots of heads nodding during that introduction..... seems like that book has touched a lot of us.  Near the end, a guy stood up to say his piece.  He talked about his hobby, photography, and how he loves photographing hummingbirds.  He wants to learn how to put food on his table, and put food on his hummingbird's table.  Loved that!   A few of us originate from foriegn ports of call..... two from Sweden, one from Belize and me.... from England.  There may have been more in the class, but they didn't introduce themselves that way.  Mmmmm, what other things did I notice?  Oh, yes, I'd say the bulk of us hold down full time jobs.... and there was a strong representation from the 20-30 something age group.  That was nice to see!

Did you know that this Master Gardener program was the first one in the country?  All other MG programs originated from this first one.  That's kinda cool.  There are currently 740 certified Master Gardeners and there'll be a hundred or so more once all us phenoms in the 2010 class graduate!   Based on some recent financial/governmental decisions our funding structure has changed (for the better is what we're being told) and we're now officially called the Washington State University Extension Master Gardener Program in King County, or WSU Extension Master Gardener Program in King County.   

After lunch we got down to our first module:  SOILS.  They used that topic as a way to introduce us to the online stuff.  We're the first class to be going through the program using an online format - which means the bulk of the learning material / assignments / quizzes / and communication are online.  Not sure how tech-savvy the students are and if it'll be a high maintenance learning curve to get us all up and running..... I'm sure there will be a few bumps in the road, but we'll get through them.

When I've digested the material each week I'll create separate blog entries summarizing key learnings from a given topic.... that way if you want to bypass my ramblings about the course and get to the gardening stuff, you can.  Be a good way for me to re-iterate what I've learned (and you to correct me when I screw up!). 

Better get to it..... want to re-review the soil stuff from yesterday and need to get cranking on this week's assignments.  I'll touch base with you later.

Friday, January 8, 2010

T-minus 1

First class starts tomorrow!   Got an email AND a phone call from the MG folks today.

Email was a summary of the January syllabus.... suffice to say, we ease into things with the first class tomorrow and then WHAMO! the work really cranks up.  I'll fill you in as things move along..... we'll be working hard from the looks of it.

Phone call was delightful..... my group lead (GL) called.  She wanted to find out how I was doing, any questions/concerns re: the program or what to do for tomorrow etc.   How nice!   No-one ever called me before my first day of grad school or before any other program/course I've taken for that matter.   I keep getting more and more impressed with how this program is being run.  

We spent 10-15 minutes chatting about this and that..... here's what I learned:

We've been organized into teams/tables, with 7 students to 1 GL/table.  Our GL is to be our first point of contact if/when questions arise or we need help etc.    Makes sense to divide and conquer.  100 or so students for one person to babysit Q&A would be insane!    Anyway.... we stay with our home team throughout the entire program but will rotate out for various classroom assignments to network with other students/GLs and gain broader exposure.   There didn't appear to be any logic that we could figure out as to who's assigned to what team.  I would have thought I'd be hanging out with some geographically similar peers, but that's not the case.  Maybe they think we'll inevitably link up with them down the road, so good to engage with folks from afar for now.

Classroom format will consist of a mix-up of lectures, activities within our teams/tables or in mixed teams/tables, show and tells and the like.   Bottom line we won't have to endure long days of one-way lecturing - thank God! 

We have assignments that say read Chapter so and so, but we won't be getting a text book.  All the readings are done online.... in fact, a sizeable chunk of the reference materials, assignments, quizzes etc are all online.  We'll be learning how to navigate through all the courseware and information during tomorrow's class.  I'm from the old school..... you have to buy a big hunking boat-anchor-sized text book, and start highlighting stuff, scribbling notes in the margins, referencing pages with colored post it notes.  Will be interesting to see how I do in a virtual world.

I asked her about her MG background..... she graduated from the MG program just two years ago.   There's no requirement that you be a seasoned MG to be a GL.... she used to be a school teacher so loves this kind of role.

Well, that's it...... off to school tomorrow.   One topic on tomorrow's agenda is SOILS.... guess they're starting from the ground up..... ha ha!

Wednesday, January 6, 2010

Participant List

We just got the master contact list of all the students who will be in the 2010 class.
I did a quick review:  About 63% of us are female, 37% male.    Didn't think there'd be that many guys out there interested in this stuff..... was thinking it would be more like 10%-15% tops.  Percentages aren't exact because there were some folks with names that didn't clearly show their gender. I ended up putting those in the female category so if some of those are also guys, then that 37% goes up even more.... interesting.

Only three of us live here in the Snoqualmie Valley..... no idea if that's considered a good rate of participation for a rural location.   Tons from Seattle (obviously!) and a smattering here and there from other locales.

We've got a hefty commute to classes each Saturday and parking's a bit tight, so we're being encouraged to connect with students from the contact list and car pool where possible.  I've reached out to my Snoqualmie Valley classmates to see who wants to ride together.  Who knows.... after all this is said and done I may end up forming new friendships with a nearby neighbor.   That would be nice!  :)