Saturday, June 11, 2011

A Good Support System

One thing caught my eye during a recent assignment at the Bellevue Demo Garden..... the amazing variety of ways to create a support structure for your growing vegetables.  Take a look at these ideas.... all of which can be done with just odd bits and pieces you have around your home.
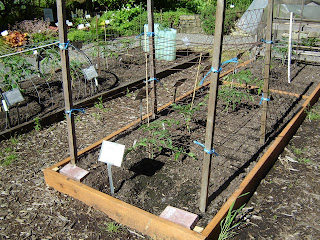
Here's a simple one that just uses some odd poles and string.....


Here's another idea...... a bit of scrap wire fencing bent over and given a little support on each end with some PVC piping and a "spine" of wood along the top......


Or how about this one?  Four poles in the corners and two layers of old fencing set up like layers of a cake (not my best photo, sorry..... look for the little blue ribbons to spot the layered mesh)....


Here's another variation on the layered cake idea..... this time with an old crate..... and a little plastic turns it into a snug little greenhouse/cloche for the emerging seedlings.  Also notice the little metal frame in front of it..... looks like an old shelving unit with the glass removed.

If you're into Dahlias, they require a more robust support system.  Umpteen old handles from worn out tools will do......


Into teepees and wig wams?  How about this one?


Got an old headboard from a bed?  Great way to keep stuff out of a landfill and add some whimsy to your garden....


In to camping?  The next two photos show examples of the "tent" approach.  Lean two segments of old wire fencing together and secure at the top..... voila!


Finally, if you're in to woodworking and want to go a little more up scale and "formal" you could build something like this..... very spiffy.

So, there you have it.  Umpteen ideas for your consideration.  Hope your veggies grow strong and tall!
What support set-ups do you have in your garden?  Using any interesting materials?  Got any you'd like to share?

Friday, June 10, 2011

Get Your Booties On!

Last weekend I paid a visit to the Bellevue Demo Garden to learn how to thin apple trees and protect them from Apple Maggot Flies and Coddling Moth.

Larry Davis was my tutor..... a member of the Fruit Tree Society he really knows his stuff and quickly got me up and running on how it's all done.  There are a number of apple trees at the demonstration garden, two of them espaliers, two columnar and one in the traditional form.
First thing to do is find a cluster of set fruit.  Ideally the fruit should be about the size of the top of your finger, but you can do the thinning and put the booties on if the fruit are a little smaller, like the ones shown below.


With your cluster identified, take a look at each fruit and identify the most vigorous fruit of the bunch (this is called the King fruit).  It'll be the one with the thickest stem.  When you find it, trim off all the others.  Yes, that seems like a total waste doesn't it?  I thought the same thing, but Larry assured me that it's better to do this than the alternative.  The fruit that remains after your thinning won't have to compete for resources, so will have every opportunity to attain its full potential.  Studies have shown a domesticated tree's productive yield is higher for trees that are thinned than from those that are not, and trees that are not thinned will, year-over-year, set less fruit as it weakens from the extended demands..... so don't chicken out.... prune them out!


Now it's time to put the booties on.  Larry handed me a plastic bag full of what looked like tiny panty hose!  Hilarious!


Actually, these Maggot Barriers are specifically made for the task - you can buy them online from any reputable gardening resource, like Territorial Seed for example. 
The barriers are small, tube-like lengths of hose, sewn closed at one end.   Each one, when stretched out lengthwise is about 8"-10" long.......


.........and when stretched out wide can cover an object about the size of a tennis ball.  If you have old panty hose lying around you can recycle them - just cut them up into lengths and tie a knot in one end - one less thing going into a landfill (thank you, thank you!), but I doubt you'll have enough old panty-hose to support the task, so be prepared to go buy a bag of the booties.


With a bootie in hand, stretch it lengthwise and widthwise to open it up, and then place it over the singled out fruit, leaving about half of the tube extending out past the fruit (to accommodate the fruit as it grows).  With the fruit covered, pinch your fingers around the base of the fruit and with your other hand, twist the remaining end of hose into a rope-like strand and carefully wrap it around the stem of the branch without mangling any leaves in the process.  This will hopefully keep it secure if it gets windy, or a bird or other critter comes along and tries to investigate.


That's it!  Rinse and repeat for however many clusters of fruit you have on your tree. 
Ideally your bootied fruit should be about 6" apart or greater, so each fruit gets maximum exposure.  If you have a few clusters growing close really together you'll need to decide which one to sacrifice (which in this case means pruning off ALL the fruit in the cluster).  Take into consideration the size of the mature fruit.... you may be able to cut that 6" distance down a little bit if you've got a species of Apple that's small.

Keep in mind you may not be able to complete your thinning/booting all in one day because:
a) it's a time consuming task and you may have a heavily laden tree, or multiple trees to manage
b) some fruit clusters may not be ready (big enough) to thin, so you'll have to come back each week for a few weeks and repeat the process until all the clusters have set.
Here's an idea...... if you've got a gardening friend who also has Apple trees, maybe you can offer to help them do theirs if they come and help you do yours.  Having a friend to natter with while you get the job done will make it more fun, and the job will get done more quickly.
Larry said booties aren't necessary for Pear trees so just go at it for your Apples, then sit back and look forward to your bounteous harvest next Fall.

Now you could abandon the idea of doing the bootie bit and once you've done your thinning go the chemical route to protect your crop, but I strongly recommend you avoid that.  You'll miss a golden opportunity to brag about how you're implementing an Integrated Pest Management plan in your garden, and you'll be able to go to sleep at night proudly knowing you were a little kinder to our planet.  Thank you! 

Tuesday, April 19, 2011

CUH: Tomatoes - Part 2

Went back to the CUH last Saturday to transplant the tomato seedlings to bigger pots.  Was curious to see how things would pan out having done a transplanting exercise at Salt Box Farm using seedlings grown in individual plugs, and we were now up against doing the transplanting from trays containing 100 of the little guys all nestled together.

First of all..... after just two weeks the seedlings were a good 2" - 2 1/2" high and looking vigorous.  Tells you what good germination conditions can produce!  Consistent 85F and moisture and voila! 


I found the best way to get a seedling safely out of the tray and into the bigger pot was to use a spoon and pretty much scoop it out.


I could see that if we hadn't been diligent in seeding in careful rows, this step would be a real pain.  Instead, they went into the pots pretty easily, so with a bunch of us cranking away at it......


...... we were able to transplant a whole lot of seedlings in about 4 hours - about 1900 to be exact.  Had to leave about 600 for the Bellevue Demo Garden to take care of..... all of us were worn out!


These 4" pots will be sold for $2.00 each at the upcoming Master Gardener Plant Sale, to be held at the Center for Urban Horticulture on May 7th and 8th.   Mark your calendars!  With three more weeks of ideal growing conditions and tender loving care from diligent Master Gardeners, they'll be good and ready for anyone's kitchen garden.  Umpteen varieties to choose from.... oh my!

That concludes my seeding/transplanting activities.  Time to move on and seek out other interesting topics for my remaining garden assignments.  Would like to learn more about managing fruit trees/canes .....

Tuesday, April 12, 2011

April Clinic at the BDG

On Saturday, April 9th I headed off to the Bellevue Demo Garden (BDG) for my 2nd year internship's first clinic.   Daffies were busting out all over...... spring is definitely springing at the BDG!


As you know from an earlier post I requested a transfer to the Bellevue Demonstration Garden for my clinic rotations.  Right off the bat I noticed the difference....... so much more my thing!  I was able to get up and walk around.  When things were slow I hung out in the garden with the other Master Gardeners and got to watch them in action/ask questions, and when it got even quieter (from a clinic perspective) I was invited to go and sit in on the Saturday workshop up at the Ranger Station.   They were discussing how to design/build cold frames - got to see recycling in action big time.... amazing what you can use to build a cold frame with..... old windows and sliding glass doors, decking, electrical conduit, PVC piping, used rebar, basement window well covers.... the list goes on!

Back at the clinic, we had a visitor with an interesting question..... "where can I buy burlap socks and organic straw - I want to make a raised bed?"  Here's an example of what she's trying to do...... obviously this photo shows it being done on a big scale, but you get the idea....


Well I've heard of burlap SACKS, but not burlap SOCKS.  I suggested she save her $$$ and get her sacks for free (told her about my recent Starbucks adventure), then cut them in half and sew up the side and voila... SOCKS galore!  Organic straw?  Mmmmmm, I'm thinking organic farms would have plenty of the stuff. 

Luckily it didn't rain, even though it looked like the skies would open up and dump on us at any minute.   Got to spend some of the quiet time reading bits of this book from the clinic library cart.........


.....suffice to say..... I think it's a real winner!  The price on the back showed $18.95, and based on the small amount of the book I got to read on Saturday I could already tell it was good money well spent!   Even though the title appears to be very focused on vegetable gardening, the contents looked applicable to a more broad audience.  Soil preparation/recipes for making your own to save $$$, seeding tips the average gardener doesn't know, how to be a smart buyer when purchasing potted starts/plants (how the nurseries make a potted plant look good for sale, when in fact it might not be a healthy choice).... all kinds of good stuff.  Detailed explanations that tell me the whys of things, and not just what to go and do...... I like that in a book.  I highly recommend you go find a copy and check it out for yourself. 


On one particular walkabout I learned how to speed up the composting process and get quicker benefit from the results.  As you know, compost piles need good doses of air to do their thing.  So, when you rotate the pile, why not sift some of it out and take the bits that are ready for your garden, and put the remainder back to keep breaking down?  Sifting adds plenty of air (ask any baker!) so you're really doing your compost pile a good service.  I've always sat and waited for the entire pile to get good and ready, not realizing it's already there for the taking if I need it.  The sieve you see here is just a simple wooden frame with some fine wire mesh tacked on the bottom.... worked like a charm.


So, it looks like I made the right decision to switch clinics.  If you're an up-and-about type person like me who doesn't sit well, the BDG clinic will give you what you need, and make your clinic rotations a much more enjoyable experience.  Now I'm looking forward to the next one rather than dreading it.  :)


Monday, April 4, 2011

CUH: Seeding Tomatoes

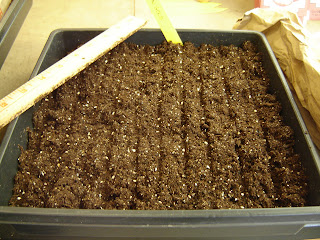
My 2nd year intern training is under way.  Got in some more seeding/greenhouse experience this past weekend...... this time at the Center for Urban Horticulture (CUH) in Seattle.  Their seeding process was similar to what I did at Salt Box Farm a few weeks ago, but one difference immediately caught my eye.  At Salt Box Farm each seed was given it's own little cell/plug to grow in, but at CUH we put 100 seeds into one tray.... in 10 little rows of 10 seeds per row. 


So what's the big deal with the difference?     Phase II - transferring the seedlings to the 4" pots.
I'm wondering how fiddly it's going to be taking them out of those trays with minimal damage when they get transferred to the bigger pots.  I'm guessing that putting them into their own little cells like we did at Salt Box Farm will make the transfer easier for the gardener and much less stressful on the little seedling. 


I would think that popping out a little plug of soil with the seedling snugged safely in it vs gently prying a seedling apart from it's tray buddies will result in a much higher success rate and a faster transfer process.  For all you seasoned seeders out there..... care to comment?  Which method do you prefer?

We ended up seeding 2,500 tomato plants.  Here they are all layed out in the greenhouse on a huge heating pad.


After that was done we prepped the 4" pots we'll be transferring the seedlings into a few weeks from now (racking up and pre-filling with potting soil), and transferred about 100 earlier starts into bigger pots.  Busy busy!  Got to hang out with a great bunch of people willing to share their skills and knowledge - learned a lot.  I'm scheduled to return on the 16th to help out with the seedling transfer effort.  Stay tuned!

Bears and Compost Piles

Got a problem with bears rummaging through your compost pile?


Well, eHow has a suggested method for solving the problem..... but below is an alternative approach that's much less expensive and less time consuming too...... heard about it at a recent gathering of the Trellis club here in Fall City.

Step 1:  Go buy a packet of twinkies .......


..... and a handful of scotch bonnet peppers....


Step 2: Put on some rubber gloves, chop up the peppers and stuff them into the twinkies.  Remember to wash your rubber gloves thoroughly when you're finished!! 

Step 3: Put the twinkies onto your compost pile..... and wait for the bear to return.

Step 4: Bear eats twinkies and has one memorable experience..... so memorable s/he learns to stay wide and clear of your compost bin, and perhaps other compost bins too.  Ta dah!

Wednesday, March 23, 2011

Leaf to Root to Flower to Fruit

As you know from earlier posts I've been attending the monthly meetings of a vegetable gardening club in our community called TrellisIn our March meeting we got to talking about crop rotation - an interesting and important topic for any vegetable gardener.  Thought I'd share with you some information about the two key benefits of crop rotation, which are:
  • Disease and insect prevention
  • Soil fertility management
Crops in the same plant families tend to attract the same insects and diseases.  By growing the same plants in the same locations year after year you enable these insects and diseases to establish themselves, making your crops more susceptible to damage or even total ruin.  By rotating your crops you break this cycle and improve the health of your garden.

Crop rotation also helps you optimize your soil's fertility.  Different families of plants have different nutrient demands..... for example, some are heavy nitrogen feeders, others need more potassium or trace minerals.  If you grow the same crops in the same beds year after year, the soil becomes depleted of that high demand nutrient, which in time will compromise your crop's health, growth and yield.   By moving your crops around each year, you'll balance out your soil's nutrient demands, minimizing your need for supplemental fertilizing and composting/manures, and fostering healthy maximum harvests.

In general, you should wait at least 3 years before planting the same family of crops in the same bed, but an easier way to remember the rule is with the little poem "LEAF to ROOT to FLOWER to FRUIT".

LEAF
Most leaf crops are heavy nitrogen feeders, so a well manured/fertilized bed is essential.


ROOT
After your leafy crops are harvested you should rotate the bed and introduce root vegetables which require less nitrogen, but more potassium and trace minerals. See how we're starting to balance our the nutrient consumption?   Composting again would be a good idea, but no additional fertilizing is needed.


FLOWER
With the first two rotations we consumed a lot of nitrogen, potassium and trace minerals.  Now we're going to put some of that back with the flower rotation.  Flowers refers to cut flowers or cover crops (as shown by the buckwheat in the photo below). Flowers not only attract beneficial insects but most often can be dug in/turned under, replenishing the soil with important nutrients, and thus preparing it for the next rotation, fruits.


FRUIT
Fruits is the final rotation.  Tomatoes, peppers and corn all grow well in a bed prepared from a dug in cover crop.  Small grains and pulses are less nutrient demanding and give pleasing yields.


Once your fruit rotation is harvested, give your beds a good dose of manure and organic fertilizer before returning to the LEAF rotation and starting the process all over again.

Much of the information shared in this post was sourced from "The Maritime Northwest Garden Guide", produced by Seattle Tilth.

Sunday, March 20, 2011

First Day of Spring

Aaaaaah!  We made it through the winter, and Daffies are busting out all over.......


Happy first day of Spring everyone.
May your gardens bloom big time this year!

Wednesday, March 16, 2011

How Many Bags?

This is just two of the three bundles....about 1600 or so bags.


Kind of interesting to see where the beans came from..... some bags had labels showing Brazil, Nicaragua and New Guinea.  No hint of coffee aroma at all since the bags contained raw beans.
Folks are already coming by to pick them up.

Recycling in action and good things being put to good use for gardens in our community.... a win win for everyone! :)

Saturday, March 5, 2011

Sowing Seeds With Nile

Fall City has a large community of avid vegetable gardeners.  Many of them gather on the 3rd Saturday of the month to swap information, share stories and educate each other on their successes and failures..... the group is called Trellis.  Here's a link to their Forum if you're interested in learning more about vegetable gardening and attending their monthly gatherings. 

I started attending their meetings at the beginning of this year in hopes of picking up pointers on the topic.  A guy named Nile Clarke is a regular attendee.  When I told the group I was interested in getting some seeding/starter/greenhouse experience he invited me to come to his farm to learn the fine art of seeding tomatoes.  Nile and his wife live at Salt Box Farm in Fall City.

When I arrived, the first thing Nile did was walk me through his 2011 Tomatoes Plan.   First lesson learned.... if you want to sow seeds, don't start creating your plan right before it's time to do the sowing..... that's too late.  You need to be thinking about this stuff way in advance - vegetable gardening isn't for procrastinators!   Planning includes deciding what varieties you want to grow, knowing how long each variety takes to mature (and therefore when you need to sow them)..... and then obtaining the seeds and all materials. 


Obtaining the seeds is often as simple as purchasing them from a reputable supplier.  Nile did some of that, but he also gathered some seeds on his own - targeting tomatoes he'd grown the previous year that were a hit, and purchasing some tomatoes he liked and harvesting those seeds. 


Nile had 16 varieties on his list and wanted to produce about 288 plants, which meant planting about 18 of each variety.  No, Nile and his wife don't swim in tomatoes each year, they generously give most of the plants away to various groups and individuals in the community.... what wonderful people they are!

288 plants, 72 segments per seed tray meant we had to prepare and sow 4 trays.

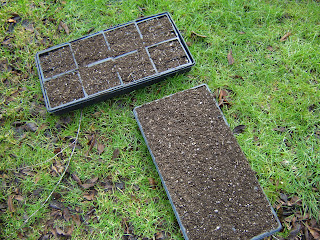
So, we started by filling each tray with good quality, well draining potting soil....


We tamped the soil down a smidge so as to make a little divot in each segment and then gave each tray a really good watering so the soil was evenly moist throughout.....


With that done, we carefully labelled each area of the tray with what we were going to plant and then did the fiddly task of putting a seed into each segment.... adding a few extras here and there for insurance purposes.  Dang, those tomato seeds are itty bitty..... this isn't something you do with gardening gloves on! 


We topped the trays off with a fine dusting of soil, and gently tamped each segment down again to create good seed to soil contact.....


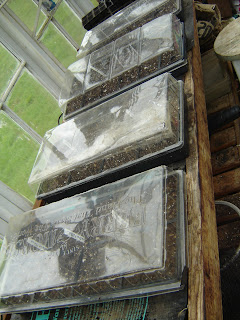
After giving each tray a gentle mist-like watering we put covers on top and set them into the greenhouse on heating mats to germinate...... which should take about 3 weeks or so.  With the covers on it may not be necessary to do any additional watering while they germinate, but Nile will be checking on things just to be sure.....


Stay tuned for the next installment of my 2011 tomato journey.  I'm hoping to return to Salt Box Farm to help transfer the seedlings to bigger pots......

Wednesday, February 23, 2011

Burlap Sacks

MARCH 16TH: UPDATE
Final count was 2400 bags!!!
I now have them staged at my house ready for you to come and get them.  For those of you who requested some I sent you logistics details via private email.
Would appreciate you picking up your allottment promptly so we can get our driveway back!
Thanks.
CW

*********************************

MARCH 12TH:  Need someone with a truck to come with me to pick up the sacks.  They won't all fit in one load.  Please reach out if you can help.  Thanks.
CW

**********************************

MARCH 6TH: NO MORE REQUESTS PLEASE!
Final count is........ (drum roll).........1900 bags!  Holy mackeral!
For those of you who submitted requests.... I'll get back to you later on this week, via email, with pick up logistics.  Stay tuned.
CW

****************************************

MARCH 5TH UPDATE:  Today's the last day to submit a request.  We're up to 1675 bags!  Oh my!

*****************************************

MARCH 3RD UPDATE:  2 days to go.  So far I have 1440 bags requested.  Any more requests out there?
******************************************

FEB 28TH ANOTHER UPDATE:  Pushed a little harder on the original Starbucks lead and voila... it's paid off!  They'll GIVE US THE BAGS FOR FREE! So..... who else wants to place an order?  Let me know before March 5th. 
*******************************************

FEB 28TH UPDATE:  Folks have been responding and I now have 750 bags on the count list!  If you're still interested in getting some, send me your counts and I'll add you to the list (deadline is March 5th).  I'll then confirm with the supplier what the cost/unit is going to be based on our final count, and get back with you so you can confirm if you're in or not in actually purchasing them.

*******************************************

Last year I learned about the value/benefit of using burlap sacks in the garden.  They're great for use as a mulching material, or to wrap around containers for added winter protection, or to wrap around a shrub with some twine to protect the plant from heavy snowfall, or to use as a "tea-bag" for making compost tea, or for covering compost bins to help retain moisture, or to haul small loads of kindling or other items from here to there.....the list goes on.....
Last year I heard the Starbucks distribution center in Kent was selling burlap bags for peanuts in big bundles of 50, 100 etc, but when I checked with them this week, I found they're not doing that anymore (at least not anyone I connected with knew about it, so I may be wrong).  BUT, fear not, I've found an alternate source Sustainable NE Seattle, that's collecting / re-selling burlap resources from many stores/restaurants/organizations.  I sent them an email to get more details...... here's their reply.....

We're happy to help you get all your burlap needs met. But there are many
different burlap bag types and grades, depending on the use you want to put them
to. And just as importantly, there are _significant_ pricing differences between
a small order (100+ bags) and a medium-sized order (400+ bags) and a large order
(800+ bags), even if each was similiarly picked up at our facility.
So to help you with pricing we'd need to have a slightly narrower idea of
the range of numbers needed, and know what kinds of bags we need to quote you
(based on the use you want to put them to - erosion control? weedblock? sheet
mulching? container planting? geo-technical filter material? etc...)

So, I'm reaching out to see what interest there is out there for this stuff?
The Trellis vegetable gardening group is pondering their needs.  What about the Fall City Garden Club, Eastside Master Gardening-related groups, Community Gardens/Pea Patches and the like? 
Share your thoughts and perhaps we can take advantage of a larger order with greater savings.... a win win for everyone! 

Wednesday, February 2, 2011

Bellevue Demo Garden: 2011 Workshop Schedule

Went to a lecture on espalier techniques for fruit trees, berry/grape vines last Saturday.  Interesting stuff.  Bellevue Demo Garden workshops are already well under way.  These workshops are all FREE and a great way for any gardener to get good info on various topics, not just us interns and MGs earning our continuing education credits! 
I've posted the schedule below.  WARNING!  Be sure to double check with the garden before heading out as changes sometimes do happen.  Would hate to see you show up expecting a lecture on one thing only to get served up something else!

Workshops happen Saturdays, 10:30am - 12 noon in the Ranger Station adjacent to the Demo Garden.  Here's the address:  15500 SE 16th Street, Bellevue, WA.  I tried leaving you a link to directions but the blog toolbar isn't working..... sorry.  Just cut and paste the address into your favorite map tool and you'll be all set!  Hope to see you there!

Feb 5th            Compost and Its Varieties: How and When to Use Them
Feb 12th          Fruit Trees - selecting and planting
Feb 19th          Organic Primer
Feb 26th          NO WORKSHOP - NW Flower and Garden Show
Mar 5th            Pruning Shrubs and Ornamentals
Mar 12th          Roses
Mar 19th          Fragrant Plants
Mar 26th          Drip Irrigation 101
Apr 2nd           Clematis
Apr 9th            Cold Frames & Greenhouses
Apr 16th          Tomatoes
Apr 23rd          NO WORKSHOP - Easter
Apr 30th          Small Garden Design
May 7th           NO WORKSHOP - Master Gardener Plant Sale at CUH
May 14th         Horticultural Mistakes
May 21st         Controlling those Pesky Moles
May 28th         NO WORKSHOP - Memorial Weekend
Jun 4th             Lavenders
Jun 11th           Berries: Strawberries, Blueberries, Raspberries, Blackberries
Jun 18th           The Herb Garden
Jun 25th           Super Clinic
Jul 2nd             NO WORKSHOP - 4th July weekend
Jul 9th              Shade Gardening
Jul 16th            Ferns
Jul 23rd            Home Composting and Soil Building
Jul 30th            Fall and Winter Vegetables
Aug 6th            Plant Bullies
Aug 13th          Gardening with Children
Aug 20th          Cactus in the Northwest
Aug 27th          Creative Propogation
Sep 3rd             NO WORKSHOP - Labor Day Weekend
Sep 10th           Native Grasses
Sep 17th           NO WORKSHOP - Harvest Festival
Sep 24th           Bulbs
Oct 1st              Preparing the Garden for Winter
Oct 8th             Dahlias
Oct 15th           Plants with Winter Interest
Oct 22nd          FINAL WORKSHOP: Garden Hand Tools and Their Care

Friday, January 21, 2011

2nd Year Internship Begins

The weather outside is awful..... cold, never-ending rain and just plain bleah..... but already things are hopping on the MG-training front.

As I think I mentioned in an earlier post, I've transferred to a new clinic this year.  My first year internship was spent at a clinic that required us to sit behind a desk, wait for folks to come up and ask us questions and we then dutifully answered.  Booooooooooring! Actually, it's not boring, it's agony for me!  I'm just not someone that likes to sit still - in fact I don't think it's in my DNA to sit still..... as far back as I can remember (and family members will quickly validate this) I've always been a fidgety-widget.... constantly on the go.  Sitting behind a table at a clinic is a total misery, so I requested a transfer to a new clinic which doesn't really do much sitting at all because it's tied in with a demonstration garden where folks are constantly up and about doing stuff, walking around showing and telling and generally providing the clinic services in a "real world" environment.  Much more my style! :)

So, my new clinic home, the Bellevue Demonstration Garden, had a January kick-off meeting a few weeks ago and I went along.   After meeting, mingling and catching up on holiday happenings, the steering committee gave a status update on things, we got to review the preliminary calendar for the year and sign up for our clinic assignments.  TIP FOR THE DAY: Be sure to do your darndest to go to this kick-off meeting..... it's your best chance to get the dates/slots you want for your assignments.  After that, there's going to be an email call out to fill in the blanks and you'll have to take what's left.  Just like our first year internship, we have to complete another 5 clinics.  I've got 2 in April, 1 in June and 2 in September.  Opens the summer months up for more hiking opportunities and holiday travels.  I'm a happy camper!

With my clinic assignments organized, I've now set about looking into the garden rotation stuff I need to get done.   Last year I did way too much weeding/watering - not value for time spent when I can do that quite easily in my own garden!  So, this year, I'm seeking out opportunities to learn particular skills:  specifically seeding/transplanting and greenhouse work, hanging out with fruit trees and learning how to manage/care for them, and veggie gardening.  The veggie gardening stuff will be covered by my time at the Bellevue Demonstration Garden, but I'm having trouble finding a Master Gardener sanctioned garden/site within tolerable driving distance that can cover the rest.  More digging/investigating to do before I declare coming up empty on this idea, but so far, not encouraging.
Stay tuned for more on this one!

So that's clinics and garden stuff moving along.  Finally there's CE (continuing Ed.) stuff.  We have to complete 10 hours during our 2 year internship.  I've got 7 in the bank so far.... 3 more to go.  Found a workshop happening next week on fruit tree pruning, so I'll go to that for starters.  I think I'll readily find other opportunities to meet the time committment, so not worried at all about getting this one done.

Looking back on what I did last year..... I'm really glad I got a hefty portion of my intern hours done so this year will be a lighter load.  I'm already enjoying having my winter weekends back.  This time last year I was heads down in classes and homework..... and this year I get to go skiing again!  Hardly did any hiking last summer..... really looking forward to getting back up in the mountains.   I think 2011's going to be a fun year! 

Tuesday, January 4, 2011

Happy New Year!

Happy New Year everyone!


May 2011 bring you a beautiful garden, abundant fruits and vegetables and much enjoyment.
I'm looking forward to my second year internship and sharing more stories/information with you as I continue my quest to become a Master Gardener. 

In the meantime...... I think I'll just go skiing!!