Tuesday, April 19, 2011

CUH: Tomatoes - Part 2

Went back to the CUH last Saturday to transplant the tomato seedlings to bigger pots.  Was curious to see how things would pan out having done a transplanting exercise at Salt Box Farm using seedlings grown in individual plugs, and we were now up against doing the transplanting from trays containing 100 of the little guys all nestled together.

First of all..... after just two weeks the seedlings were a good 2" - 2 1/2" high and looking vigorous.  Tells you what good germination conditions can produce!  Consistent 85F and moisture and voila! 


I found the best way to get a seedling safely out of the tray and into the bigger pot was to use a spoon and pretty much scoop it out.


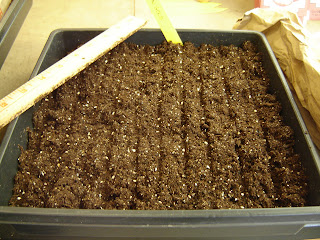
I could see that if we hadn't been diligent in seeding in careful rows, this step would be a real pain.  Instead, they went into the pots pretty easily, so with a bunch of us cranking away at it......


...... we were able to transplant a whole lot of seedlings in about 4 hours - about 1900 to be exact.  Had to leave about 600 for the Bellevue Demo Garden to take care of..... all of us were worn out!


These 4" pots will be sold for $2.00 each at the upcoming Master Gardener Plant Sale, to be held at the Center for Urban Horticulture on May 7th and 8th.   Mark your calendars!  With three more weeks of ideal growing conditions and tender loving care from diligent Master Gardeners, they'll be good and ready for anyone's kitchen garden.  Umpteen varieties to choose from.... oh my!

That concludes my seeding/transplanting activities.  Time to move on and seek out other interesting topics for my remaining garden assignments.  Would like to learn more about managing fruit trees/canes .....

Tuesday, April 12, 2011

April Clinic at the BDG

On Saturday, April 9th I headed off to the Bellevue Demo Garden (BDG) for my 2nd year internship's first clinic.   Daffies were busting out all over...... spring is definitely springing at the BDG!


As you know from an earlier post I requested a transfer to the Bellevue Demonstration Garden for my clinic rotations.  Right off the bat I noticed the difference....... so much more my thing!  I was able to get up and walk around.  When things were slow I hung out in the garden with the other Master Gardeners and got to watch them in action/ask questions, and when it got even quieter (from a clinic perspective) I was invited to go and sit in on the Saturday workshop up at the Ranger Station.   They were discussing how to design/build cold frames - got to see recycling in action big time.... amazing what you can use to build a cold frame with..... old windows and sliding glass doors, decking, electrical conduit, PVC piping, used rebar, basement window well covers.... the list goes on!

Back at the clinic, we had a visitor with an interesting question..... "where can I buy burlap socks and organic straw - I want to make a raised bed?"  Here's an example of what she's trying to do...... obviously this photo shows it being done on a big scale, but you get the idea....


Well I've heard of burlap SACKS, but not burlap SOCKS.  I suggested she save her $$$ and get her sacks for free (told her about my recent Starbucks adventure), then cut them in half and sew up the side and voila... SOCKS galore!  Organic straw?  Mmmmmm, I'm thinking organic farms would have plenty of the stuff. 

Luckily it didn't rain, even though it looked like the skies would open up and dump on us at any minute.   Got to spend some of the quiet time reading bits of this book from the clinic library cart.........


.....suffice to say..... I think it's a real winner!  The price on the back showed $18.95, and based on the small amount of the book I got to read on Saturday I could already tell it was good money well spent!   Even though the title appears to be very focused on vegetable gardening, the contents looked applicable to a more broad audience.  Soil preparation/recipes for making your own to save $$$, seeding tips the average gardener doesn't know, how to be a smart buyer when purchasing potted starts/plants (how the nurseries make a potted plant look good for sale, when in fact it might not be a healthy choice).... all kinds of good stuff.  Detailed explanations that tell me the whys of things, and not just what to go and do...... I like that in a book.  I highly recommend you go find a copy and check it out for yourself. 


On one particular walkabout I learned how to speed up the composting process and get quicker benefit from the results.  As you know, compost piles need good doses of air to do their thing.  So, when you rotate the pile, why not sift some of it out and take the bits that are ready for your garden, and put the remainder back to keep breaking down?  Sifting adds plenty of air (ask any baker!) so you're really doing your compost pile a good service.  I've always sat and waited for the entire pile to get good and ready, not realizing it's already there for the taking if I need it.  The sieve you see here is just a simple wooden frame with some fine wire mesh tacked on the bottom.... worked like a charm.


So, it looks like I made the right decision to switch clinics.  If you're an up-and-about type person like me who doesn't sit well, the BDG clinic will give you what you need, and make your clinic rotations a much more enjoyable experience.  Now I'm looking forward to the next one rather than dreading it.  :)


Monday, April 4, 2011

CUH: Seeding Tomatoes

My 2nd year intern training is under way.  Got in some more seeding/greenhouse experience this past weekend...... this time at the Center for Urban Horticulture (CUH) in Seattle.  Their seeding process was similar to what I did at Salt Box Farm a few weeks ago, but one difference immediately caught my eye.  At Salt Box Farm each seed was given it's own little cell/plug to grow in, but at CUH we put 100 seeds into one tray.... in 10 little rows of 10 seeds per row. 


So what's the big deal with the difference?     Phase II - transferring the seedlings to the 4" pots.
I'm wondering how fiddly it's going to be taking them out of those trays with minimal damage when they get transferred to the bigger pots.  I'm guessing that putting them into their own little cells like we did at Salt Box Farm will make the transfer easier for the gardener and much less stressful on the little seedling. 


I would think that popping out a little plug of soil with the seedling snugged safely in it vs gently prying a seedling apart from it's tray buddies will result in a much higher success rate and a faster transfer process.  For all you seasoned seeders out there..... care to comment?  Which method do you prefer?

We ended up seeding 2,500 tomato plants.  Here they are all layed out in the greenhouse on a huge heating pad.


After that was done we prepped the 4" pots we'll be transferring the seedlings into a few weeks from now (racking up and pre-filling with potting soil), and transferred about 100 earlier starts into bigger pots.  Busy busy!  Got to hang out with a great bunch of people willing to share their skills and knowledge - learned a lot.  I'm scheduled to return on the 16th to help out with the seedling transfer effort.  Stay tuned!

Bears and Compost Piles

Got a problem with bears rummaging through your compost pile?


Well, eHow has a suggested method for solving the problem..... but below is an alternative approach that's much less expensive and less time consuming too...... heard about it at a recent gathering of the Trellis club here in Fall City.

Step 1:  Go buy a packet of twinkies .......


..... and a handful of scotch bonnet peppers....


Step 2: Put on some rubber gloves, chop up the peppers and stuff them into the twinkies.  Remember to wash your rubber gloves thoroughly when you're finished!! 

Step 3: Put the twinkies onto your compost pile..... and wait for the bear to return.

Step 4: Bear eats twinkies and has one memorable experience..... so memorable s/he learns to stay wide and clear of your compost bin, and perhaps other compost bins too.  Ta dah!